Typo3 Editing Guide
From RHESSI Wiki
| Line 30: | Line 30: | ||
*More Options ... | *More Options ... | ||
*Hide - Hides the web page or content element so it is not displayed on the live website | *Hide - Hides the web page or content element so it is not displayed on the live website | ||
| - | *Visibility Settings - Allows the user to set controls for displaying and hiding a | + | *Visibility Settings - Allows the user to set controls for displaying and hiding a webpage or content element |
*Edit Page Properties - edits metadata on the page | *Edit Page Properties - edits metadata on the page | ||
*Delete - Deletes the page or content element | *Delete - Deletes the page or content element | ||
| Line 36: | Line 36: | ||
*History/Undo - Allows the user to look at editing history of page and revert it to a previous version | *History/Undo - Allows the user to look at editing history of page and revert it to a previous version | ||
| - | + | ===Creating a New Page=== | |
| + | Selecting the option to create a new page will give the user options on the location of the page and the metadata for the page (title, direct URL, etc.) Once these have been selected content elements for the page can be created. The menu of different possible content elements is hown below along with the selection for the location of the element on the page. | ||
| + | [[Image:Content element.jpg |center|thumb|600px|A list of possible content elements to add to a page along with a selection for the position of the elements on the page.]] | ||
| + | |||
| + | The content elements are described in the text below the radio buttons which allow the user to select an element to add. | ||
[[Image:Rich text editor.jpg |center|thumb|600px|]] | [[Image:Rich text editor.jpg |center|thumb|600px|]] | ||
Revision as of 16:20, 25 October 2010
Introduction
This guide is short tutorial on adding and editing content on the RHESSI Website. In order to edit the site you must have a username and password. If you have these, you can login here:
The images used were taken from the Typo3 Wiki. A longer guide to editing content in Typo3 can be found here. An even more extensive guide in PDF form can be found here.
The Backend Tree
Once you have logged in to the site, click on View on the upper left of the page. The page should now appear similar to the screen shot below.
The part labeled (1) is task menu. For this list you can select from the tasks you are authorized to perform, depending on your user privileges. The next part, labeled (2), shows the page tree. This is the hierarchical listing of all pages on the current site. The top page is the home page, all pages branch for here and are shown in their position below the page they are spawned from in the tree. The section labeled (3) is the work area. The area labeled (4) shows the details for the user logged in. You should see your username along with details on the workspace you are using, any shortcuts you've added to pages you are working on, and the search function. Keep in mind that you should create all your pages in the Draft Workspace. If you are in the Draft Workspace, a banner will appear above section (2) saying Draft Workspace.
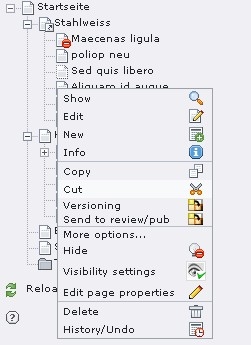
The basic tree for the new site has been created. Right Clicking on any page will cause the menu in the image below to appear.
Briefly, starting at the top and working our way down, each option in the menu does the following:
- Show - Displays the web page as it will appear when published
- Edit - Allows the user to edit the title and metadata on a page
- New - Allows the user to create a new page, a new content element, or change system records
- Info - Displays all page information, such as last date edited and URL
- Copy - Copies the page
- Cut - Cuts content from the page
- Versioning - Shows information on the editing history of the page
- Send to Review/Pub - Send finished page to be reviewed and published on the live website
- More Options ...
- Hide - Hides the web page or content element so it is not displayed on the live website
- Visibility Settings - Allows the user to set controls for displaying and hiding a webpage or content element
- Edit Page Properties - edits metadata on the page
- Delete - Deletes the page or content element
- History/Undo - Allows the user to look at editing history of page and revert it to a previous version
Creating a New Page
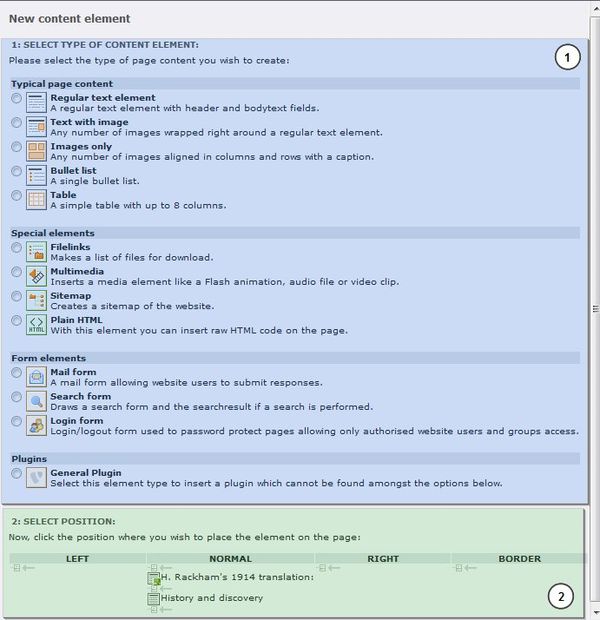
Selecting the option to create a new page will give the user options on the location of the page and the metadata for the page (title, direct URL, etc.) Once these have been selected content elements for the page can be created. The menu of different possible content elements is hown below along with the selection for the location of the element on the page.
The content elements are described in the text below the radio buttons which allow the user to select an element to add.


