Show synop
From RHESSI Wiki
(Difference between revisions)
m (Editing) |
(Completed main widget docu) |
||
| Line 24: | Line 24: | ||
| This keyword allows sharing or reusing ''plotman'' (e.g. between an active ''plotman'' window and ''show_synop'') || <source lang="ittvis_idl">p=[f]plotman[/f](/nopanel) & [p]show_synop[/p], plotman=p</source> | | This keyword allows sharing or reusing ''plotman'' (e.g. between an active ''plotman'' window and ''show_synop'') || <source lang="ittvis_idl">p=[f]plotman[/f](/nopanel) & [p]show_synop[/p], plotman=p</source> | ||
|} | |} | ||
| + | |||
| + | === show_synop main widget === | ||
[[Image:show_synop.description.overview.jpg]] | [[Image:show_synop.description.overview.jpg]] | ||
| - | # ''Done'' closes ''show_synop'', ''GOES Workbench'' opens a separate widget that allows for GOES data visualization (see XXX), and ''Configure'' shows the show_synop configuration options (see XXX). | + | # ''Done'' closes ''show_synop'', ''GOES Workbench'' opens a separate widget that allows for GOES data visualization (see XXX), and ''Configure'' shows the ''show_synop'' configuration options (see XXX). |
| - | # | + | # ''Start Time'', ''End Time'', and ''remote sites->'' are used for the time and instrument based search that is started by clicking on the ''Search'' button. The drop-down list at ''remote sites ->'' shows all currently supported instruments. A click on the button ''# Sub-intervals: 0'' opens an GOES light-curve based search (see XXX). |
| - | # | + | # The box currently showing ''*** Press "Search" to list filenames ***'' lists the search results. The list shows file name, observation time, wavelength, and file size. The sorting can be changed to ''Filename'', ''Decreasing Date'', and ''Increasing Date''. |
| + | # ''View Header'' allows you to view the FITS header of a selected file. The ''Display'' button will pre-process the selected data file locally (if the instrument software is installed) or remotely using the [[PrepServer]]. Pre-processed data is then displayed it with [http://hesperia.gsfc.nasa.gov/ssw/gen/idl/plotman/doc/plotman_help.htm PLOTMAN]. To remove a data file from the local hard disk click on ''Delete''. | ||
| + | # This text box indicates the current working directory. ''Change'' allows browsing to another folder on the local hard disk. | ||
| + | # This is a list of all files in the selected working directory (see bullet N° 5). | ||
== Troubleshooting == | == Troubleshooting == | ||
Revision as of 15:12, 24 August 2010
Contents |
Purpose
show_synop is a SolarSoftware IDL widget that incorporates searching the Virtual Solar Observatory (VSO), pre-processing, and displaying capabilities into one graphical user interface (GUI). Also see RHESSI Nugget N° 131 Cloudy SolarSoftware.
Requirements
- Up-to-date SSW gen tree, installation and download instructions
- If using remote pre-processing capabilities
- IDL 6.4 or later
- Sun Java 1.5
Description
; Routine syntax
show_synop, plotman=plotman
The plotman keyword is optional.
| Keyword | Description | Example |
|---|---|---|
| plotman | This keyword allows sharing or reusing plotman (e.g. between an active plotman window and show_synop) | p=plotman(/nopanel) & show_synop, plotman=p |
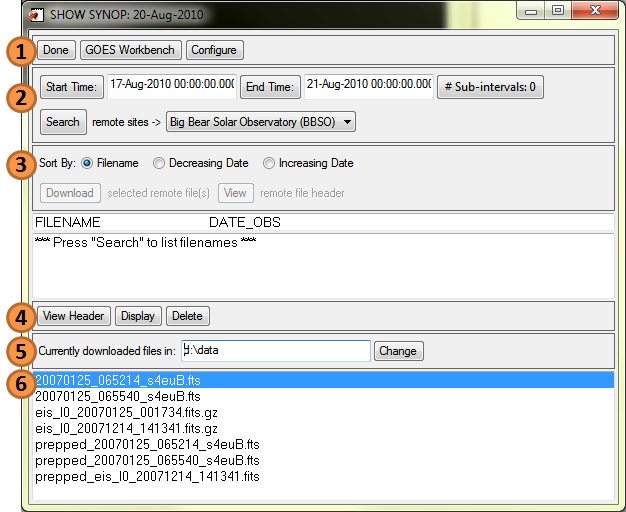
show_synop main widget
- Done closes show_synop, GOES Workbench opens a separate widget that allows for GOES data visualization (see XXX), and Configure shows the show_synop configuration options (see XXX).
- Start Time, End Time, and remote sites-> are used for the time and instrument based search that is started by clicking on the Search button. The drop-down list at remote sites -> shows all currently supported instruments. A click on the button # Sub-intervals: 0 opens an GOES light-curve based search (see XXX).
- The box currently showing *** Press "Search" to list filenames *** lists the search results. The list shows file name, observation time, wavelength, and file size. The sorting can be changed to Filename, Decreasing Date, and Increasing Date.
- View Header allows you to view the FITS header of a selected file. The Display button will pre-process the selected data file locally (if the instrument software is installed) or remotely using the PrepServer. Pre-processed data is then displayed it with PLOTMAN. To remove a data file from the local hard disk click on Delete.
- This text box indicates the current working directory. Change allows browsing to another folder on the local hard disk.
- This is a list of all files in the selected working directory (see bullet N° 5).
